 Just a little something I'd like to share today. I am actually in Germany at the moment, taking over my dad's computer, much to his joy (ahem). So I'm sharing with you a frame I made last week. A friend asked me for a music inspired frame for her sister so this is one of the 2 I came up with and definitely my favourite of the 2. I used beeswax on this and a music background stamped onto tissue. The treble clef is from the Maya Road set and simply painted brown and covered in glossy accents. Very simply but effective and makes a lovely christmas present I think.

Friday, 26 November 2010
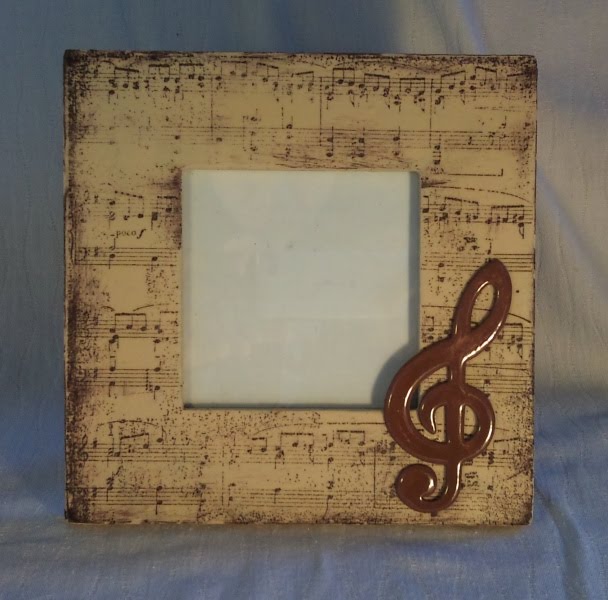
Beeswax Music Frame
Just a little something I'd like to share today. I am actually in Germany at the moment, taking over my dad's computer, much to his joy (ahem). So I'm sharing with you a frame I made last week. A friend asked me for a music inspired frame for her sister so this is one of the 2 I came up with and definitely my favourite of the 2. I used beeswax on this and a music background stamped onto tissue. The treble clef is from the Maya Road set and simply painted brown and covered in glossy accents. Very simply but effective and makes a lovely christmas present I think.
Thursday, 25 November 2010
Recycled Mini Canvases - For The Altered Element
Here is another little Recycle project I made for The Altered Element.
A while back I couldnt get enough of mini canvases and decorated a whole lot of them, but not all turn out the way you want, but I kept them nevertheless. And these came in handy for this project.
I used the back of one canvas and from another one I used just the wooden frame, glued on top. That makes a nice little deep frame, ideal to hold little bottles, ornaments or other small objects.

I textured the whole thing with Viva Decor Terra Paste and then painted it over in cream when it was dry. I then rubbed some greenish gold paste, also by Viva Decor, over the top, just using my fingers.
The bottle has been filled with sand from a recent holidays and the twigs and died brown leaves also came from my holiday.
As for the flowers I used Maya Road metal flowers and treated them with Crafty Notions Rusting Powder.

So if you ever have any little (or bigger) canvases lying around, put them to good use and make a deep frame. The texture paste hides the canvas and imperfections of the frames perfectly.
Happy crafting!
Wednesday, 24 November 2010
More CCC and Stamp and Show

Double distress is the theme over at Studio L3 this week and how perfectly does that fit in with the Simon says Stamp and Show "distress inks" theme?!?! Very much so!
I used my music embossing folder for the first time on some grungepaper here. I like the idea of embossing folders but never seem to get it right, but this time, using grungepaper as a base I think it worked really well. I'm pleased.
Have you noticed this is not a christmas card? I'm shocked. I think I've finally had enough of christmas card making and I'm gonna slowly get back to other cards now.....

The double distress technique is a bit messy I find, well you get really inky fingers, but that's part of the fun!
With this background I had gone quite dark so I tried to lighten the trees and make them stand out a bit with some stickles around the edges. I'm slowly finding more uses for stickles, should invest in some more really. Maybe santa will bring me some!!!
Saturday, 20 November 2010
Simon says Stamp and Show - Whatever makes you happy
 All week I've been meaning to add my entry for the Simon says Stamp and Show Challenge, but somehow I didn't manage to take photos of my piece.
So the theme is Whatever makes you happy..... and it makes me very happy when a project finally comes together.
I thought a few weeks ago it be nice to make some windchimes so I went on ebay looking for chimes I can take apart and looked through the charity shops and then had a look through my stash what would go nicely and somehow you keep buying more stuff and bits and this would look good on it etc ..... I'm sure we've all been there.
And then you work out a design and do a testpiece and then finally it will all come together and the finished piece is hanging in your room and it was worth the effort.

For this one I used 3 chipboard cutouts of the Tim Holtz tattered florals die and coloured it with distress inks. I hid the knots of the string in the middle layer of the flower to make it neater. I then added random beads and charms at the top. And the bottom hangy thing is a Maya Road flower frame, also coloured with distress inks and more dangly bits added.
It looks very simple but it took a while to work out how to attach and hide the strings and what length things need to be.
It's my first attempt, I'm sure the next ones will be easier. I'm currently working on a Tim Holtz inspired one and another using an alterations die. So watch this space.
Tim Holtz inspired Christmas Baubles
I've been wanting to join in with 2 challenges - The Stampman Challenge where the theme is Tim Holtz Christmas and the Sir Stampalot Challenge where the theme is Christmas Traditions. So when I saw these clear plastic baubles I knew they'd be perfect to make up something christmassy.
On the blue ones I used stream alcohol ink in the inside and then stamped some snowflake from one of the Tim Holtz sets on the outside. I filled one with polystryrene balls and the other with chunky flitter. These are my first attempts so I reckon if I spend some more time playing around with the clear balls the results could be quite stunning and make nice decorations on my tree this year. Or even as a christmas gift for someone.

The next two I coloured with alcohol inks again, latte or ginger I cant quite remember. One baubles spells JINGLE BELLS on the outside and is filled with rusty bells. The other one says MERRY & BRIGHT and I filled that one with golden stars.

I have a load more baubles to decorate so pop back to see how the others turned out.
In the meantime have a crafty weekend!!
Friday, 19 November 2010
Compendium of Curiosities Challenge #22

It's time for another Compendium Challenge over at Studio L3. We are playing with alcohol inks again this week and they are still not my favourite but I gave it a go anyway. Like last time I still haven't bought any glossy card (I have been meaning to but still never do) so I used some silver card again, since it's christmas soon I thought the silver would go well.
I have to say I really enjoyed this technique. Very colourful and it looks gorgeous. I punched out some snowflakes and use dthem on some christmas cards. Not your traditional christmas colours but I think they are a little different.

Thursday, 18 November 2010
The ABC Challenge - Holidays
 Holidays is the current theme at the ABC Challenge and what else could I be making other than a christmas holidays card.
I use dthe new Tim Holtz die I've been dying to use for ages, add some sparkle and a simple starry background and you have a pretty little card.
I'm really liking this one.
Wednesday, 17 November 2010
Card Patterns Sketch 90
 Another week and another Card Patters Sketch.... I just had to use the little felt trees my sister sent me the other day. So here goes, another xmas card.....
Tuesday, 16 November 2010
Christmas Tealight Holders - For The Altered Element
Today I'd like to share with you a really quick little project.
I had these plain wooden tealight holders sitting here for ages and they didn't look much, so I thought I give them a makeover for christmas.
I painted them in a neutral colour, traditional tan in this case.
I then stamped the images I wanted to use on 1 ply of tissue using staz on.
I then covered the wood block in a thin layer of beeswax and melted the tissue images into it with a heatgun. It's very quick and easy and beeswax is a fab product to work with.

This technique would also work on any other wooden onjects, maybe you have some old picture frames lying around that could do with a makeover? Or a wooden box? Just give it a go, it's great fun.
Friday, 12 November 2010
Christmas decorations Part 1....... Candles
 Still ajorly in christmas mood and eagerly counting down the days. I took a break from all my christmas cards and had a play with these candles for a change. I've had these sittig here for a while and noone is using them so I thought I may as well make them christmassy and then still noones going to use them, haha. At least they look pretty. I directly stamped onto the middle one, the others just have bands of paper and lace around them with stamped and cut out images and not to forget the 2 bells.
 These two I stamped my images onto tissue first and then melted it into the candle with the heatgun.
If you have some candles hanging around that you don't use this be the perfect way to make them christmassy, they'd even make quick and festive presents.
Thursday, 11 November 2010
My favourite Tim Stamp and a new Compendium Technique
 Another week brings another Compendium Challenge and Simon says Stamp and Show too. I do enjoy both challenges very much but there isnt always time to join in..... luckily this week there was time and I combined the two.
I used the pinecone stamp from the new Tim Holtz sets, I love that stamp at the moment. It's very chistmassy but not overly kitsch, just pretty and lovely to work with.
And I had a go at the Perfect Distress Technique from the compendium. I did try it before but it didnt work that well, this time it turned out much better. Shame you cant tell the golden shimmer from the photo very well, but let me assure you its very pretty!!!
Wednesday, 10 November 2010
Something hidden - Artistic Stamper Challenge
 Something hidden is the theme on the Artistic Stamper Creative Team Blog, so I decided to make this box card..... it has to be a christmas card, it's all I'm allowed to do at the moment.
Although making all them cards and buying presents now made me count down days to christmas and running round like a mad woman telling everyone at work how many days til christmas. Ah well..... christmas spirit.
So I've been wanting to make a card that laces up for ages, always loved laced up things for some reason.
It's white linen card simply folded, holes punched out and laced up........... but there is a secret...... open the card and there is......

......a little silver snowflake charm. The message reads.... A Snowflake is a winter's butterfly.
There goes, my first lace up card and it's being entered into the Artistic Stamper Challenge.
Thursday, 4 November 2010
Memories frame .... Mixed Media Monday Challenge

I didn't want to wait for the arrival of the Configurations boxes by Tim Holtz so a little while ago I started on this frame and made my own little compartments inside a shadow box frame.
I loved Tim's idea (and I'll be trying out the configurations boxes now that I got my inky hand on them finally!!) and just had to give it a go. So I split the frame into little boxes using foam board. I made some compartments for certain objects I wanted to use and others were just random sizes. A favourite of mine is the old miniature bottle I bought a while back, it's all sticky and the contents have evaporated and the label looks all old and dirty.
It's a great way of creating a memory box, this could be to any theme you like or just filled with random objects. It's fun, give it a go.
I also recently discovered the Mixed Media Monday Challenge, check it out, Im off to link my box to their blog now and browse all the other fab boxes entered this month!


Wednesday, 3 November 2010
Junk Accessories for The Altered Element - November Theme "Recycle"
It's a new month and a new theme at The Altered Element.
This month we RECYCLE.
I'm in a bit of a jewellery making mood at the moment so I'd like to share with you some of my "Junk" creations.
It all started off with an old belt I had, it was made up from square wooden tile beads and other wooden beads. As I never wore it, I cut it up and used the wooden tiles as a starting point for my jewellery.


I painted the tile black, when it was dry I glued some bits of card from the Tim Holtz Lost and Found Paper Stack to both sides of the tile, using Glossy Accents. I cut round the edges and inked all edges with Black Soot Distress Ink. Then I covered one side in glossy accents and let it dry overnight. It gives a nice shiny finish and transforms the old wooden tile into a brandnew shiny bead. Cover the other side in glossy accents and leave to dry again. Then repeat the same step around the edges.
When that had dried I attached a lot of random bits, charms, safety pins, beads, idea-ology etc to the bottom using some eyepins. It's a great way of using up old tatty bits, broken pieces of jewellery, beads you no longer want, just use your imagination, if you can attach a jumpring to it somehow, you can make it into junk jewellery.
For my next piece I used more of them wooden tiles, 7 were enough to fit my wrist. I cut out letters from the Tim Holtz stack again to spell JOURNEY and IMAGINE on the reverse side.
What would work well are the Artchix Inchies Collage Sheets. Roughly the right size, they would make a beautiful piece of jewellery.
Simply strung together with some elastic and some small coco beads as spacers. Done.

I do like bracelets, so I straight away made another one.
This time I used some silver chain, a lot of jumprings and I simply attached a whole lot of buttons with them. Very easy, although it can take some time. This is another great way of using up short pieces of chain and old buttons you have leftover.

Simply attach a lot of stuff to the ring at the bottom and you got a quick and easy keyring made from old tat. I especially like the little orange pawn. And I cut up an old wooden measure, drilled a hole in the top and glued an eyelet into it.


Last but not least is another keyring. This time I used another of them wooden tiles.
Again you could be hanging anything from this. Rummage round the attic and see what old games you may have lying around, even if it's not complete anymore, use up the little bits like scrabble tiles. Small chess pieces would work well too. I used a ringpull from a can here and some hooks I found in a sewing box a while back. Old snaps would work too.


I hope I've been able to inspire you a bit and I would love to see your junk creations.
Tuesday, 2 November 2010
Compendium of Curiosities Challenge - Industrial Grunge

It's been a while since I last joined in on the Compendium Challenge. I have missed it but I've just been too busy with other things and of course I was on holiday.
So this week it's Industrial Grunge. Can't say that I had tried it before. And I don't think I will be using this technique much in the future but at least I've tried it once.
And of course it had to be a christmas card, it's the only thing I'm making at the moment.... card wise anyway.
Only 53 days til christmas, yeah!!!!
Subscribe to:
Posts (Atom)