Showing posts with label maya road. Show all posts

Friday, 7 October 2011

Wendy Vecchi Clock for Simon says Stamp and Show

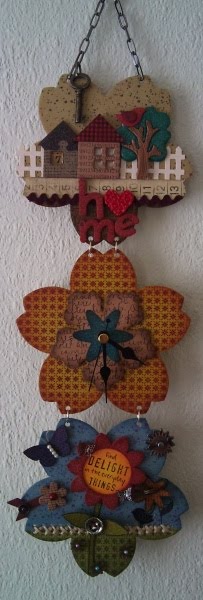
I've made a clock similar to this before, using the other 3 flowers out of this Maya Road chipboard album and I have been meaning to make a 2nd clock for ages to give to my Mum. So as it's Wendy Vecchi week at Simon says Stamp and Show I thought now is the time.

I used loads of Maya Road mini chipboard shapes and cut flowers from grungepaper. Some idea-ology, plenty of colour and background stamps. It's easy but takes time to colour each piece and figure out what goes where. Well worth the effort in the end though. And I love the concept of the 2 decorated flowers with the clock in the middle.

I also wanted to mention the Wendy Vecchi Flickr Group that I started a while back with Wendy's permission. Slowly people join and add their creations but I'd like it to be more for more great Wendy art to admire. So if you are a regular on Flickr then come and join us here.


Friday, 26 November 2010

Beeswax Music Frame

Just a little something I'd like to share today. I am actually in Germany at the moment, taking over my dad's computer, much to his joy (ahem). So I'm sharing with you a frame I made last week. A friend asked me for a music inspired frame for her sister so this is one of the 2 I came up with and definitely my favourite of the 2. I used beeswax on this and a music background stamped onto tissue. The treble clef is from the Maya Road set and simply painted brown and covered in glossy accents. Very simply but effective and makes a lovely christmas present I think.

Saturday, 20 November 2010

Simon says Stamp and Show - Whatever makes you happy

All week I've been meaning to add my entry for the Simon says Stamp and Show Challenge, but somehow I didn't manage to take photos of my piece.
So the theme is Whatever makes you happy..... and it makes me very happy when a project finally comes together.
I thought a few weeks ago it be nice to make some windchimes so I went on ebay looking for chimes I can take apart and looked through the charity shops and then had a look through my stash what would go nicely and somehow you keep buying more stuff and bits and this would look good on it etc ..... I'm sure we've all been there.
And then you work out a design and do a testpiece and then finally it will all come together and the finished piece is hanging in your room and it was worth the effort.


For this one I used 3 chipboard cutouts of the Tim Holtz tattered florals die and coloured it with distress inks. I hid the knots of the string in the middle layer of the flower to make it neater. I then added random beads and charms at the top. And the bottom hangy thing is a Maya Road flower frame, also coloured with distress inks and more dangly bits added.

It looks very simple but it took a while to work out how to attach and hide the strings and what length things need to be.
It's my first attempt, I'm sure the next ones will be easier. I'm currently working on a Tim Holtz inspired one and another using an alterations die. So watch this space.

Tuesday, 19 October 2010

Maya Road Kids Clock


Yes I did make another clock using all those lovely Maya Road mini chipboards. I wanted to make this a bit fun and colourful for my nephew Niklas. He will be 18 months around December and as I'm putting some things in an advent calendar for him I thought I make a clock for his room. That way my sister knows what time it is and he can soon learn the words for all the pretty things on the clock. I coloured the base with distress inks and most of the chipboards too. The heart has red flock stuff on it, the birdie is covered in white glitter, the tree and crown and done with utee and the key and lock are embossed with distress embossing powder.

Saturday, 16 October 2010

Maya Road Flower Clock


I can finally share with you a project I made weeks ago, and it took me weeks too. It was one of the things I made for the Stamper of the year competition but I then didn't feel like sending for some reason or the other. I used a Maya Road chipboard book in sape of a flower. I couldn't get this in the UK so I had to order it in from the US. In fact many things on this project I especially ordered for this. But now I have a rather large collection of Maya Road mini chipboards to play with in future projects.
I really like the little tree, I covered the top in green utee and then pressed the trunk in, it works so well.
There is lots to discover in these little pictures and as I like making useful objects i thought a cock be perfect.

I am also entering this into the Artistic Stamper Challenge where this month's theme is Layers.


Wednesday, 6 October 2010

My first Art Parts creation....

TA DA!!! My first Art Parts creation....
I got rather excited when I picked these up at the Stamp and Scrapbooking Show and I finally got a chance to play with them.
I wasn't too sure how to work them, I inked them with pigment ink but the edges where they've been cut where shining through dark, so I decided to paint them with acrylic first and then ink them and then just stamp on them. Have not before painted things in a light colour and then inked them, always seem to be working straight onto chipboard but it works well, gives a nice strong colour. I wanted to sneak in a flower made from Maya Road wings like Wendy suggested on her blog recently, but instead the wings ended up as leaves for the flower. Also popped in a few snowflakes as flowers.


Before I decided on the above design though I spent hours moving art parts round my desk and trying to decide what to do. I first covered the frame in tissue tape and then I had to learn the hard way that crackle paint just comes off the tissue tape when dry.


Maybe I'll try inking the tissue tape next time, still got the round frame of the art parts.

So, anyway, I am entering this into The Artistic Stamper Creative Team Blog Challenge for the month where the theme is Layer it on, and OMG are there a lot of layers on this frame, the flower alone is 5 chipboard layers high.

Saturday, 2 October 2010

Scary autumn bird frame thingy......

I really wanted to try out the new alterations tree die and the frame kinda developed from there. I paintd a frame in trad tan and then I didnt want to do the usual swiping of ink, stamping script across is, so I just had my alcohol inks out and started playing with that and it gives this really nice autumny effect on the frame. I then cut a lot of tattered leaves from shrinkies and stamped them with script and also used alcohol inks on them, when they shrunk tho they went REALLY dark, darker than I wanted, but never mind. To them leaves I also added some acetate punch outs, also stamped with script.
I kinda just kept adding things to the frame and this is the result, it looks really odd I find, but I kinda like it.
So I am entering this into the Simon says Challenge, where the theme is autumn colours.