Wednesday, 3 November 2010

Junk Accessories for The Altered Element - November Theme "Recycle"

It's a new month and a new theme at The Altered Element.
This month we RECYCLE.
I'm in a bit of a jewellery making mood at the moment so I'd like to share with you some of my "Junk" creations.
It all started off with an old belt I had, it was made up from square wooden tile beads and other wooden beads. As I never wore it, I cut it up and used the wooden tiles as a starting point for my jewellery.


I painted the tile black, when it was dry I glued some bits of card from the Tim Holtz Lost and Found Paper Stack to both sides of the tile, using Glossy Accents. I cut round the edges and inked all edges with Black Soot Distress Ink. Then I covered one side in glossy accents and let it dry overnight. It gives a nice shiny finish and transforms the old wooden tile into a brandnew shiny bead. Cover the other side in glossy accents and leave to dry again. Then repeat the same step around the edges.
When that had dried I attached a lot of random bits, charms, safety pins, beads, idea-ology etc to the bottom using some eyepins. It's a great way of using up old tatty bits, broken pieces of jewellery, beads you no longer want, just use your imagination, if you can attach a jumpring to it somehow, you can make it into junk jewellery.
For my next piece I used more of them wooden tiles, 7 were enough to fit my wrist. I cut out letters from the Tim Holtz stack again to spell JOURNEY and IMAGINE on the reverse side.
What would work well are the Artchix Inchies Collage Sheets. Roughly the right size, they would make a beautiful piece of jewellery.
Simply strung together with some elastic and some small coco beads as spacers. Done.


I do like bracelets, so I straight away made another one.
This time I used some silver chain, a lot of jumprings and I simply attached a whole lot of buttons with them. Very easy, although it can take some time. This is another great way of using up short pieces of chain and old buttons you have leftover.


Next up is a keyring. The Tim Holtz Swivel Clasps make great keyring.
Simply attach a lot of stuff to the ring at the bottom and you got a quick and easy keyring made from old tat. I especially like the little orange pawn. And I cut up an old wooden measure, drilled a hole in the top and glued an eyelet into it.


Last but not least is another keyring. This time I used another of them wooden tiles.
Again you could be hanging anything from this. Rummage round the attic and see what old games you may have lying around, even if it's not complete anymore, use up the little bits like scrabble tiles. Small chess pieces would work well too. I used a ringpull from a can here and some hooks I found in a sewing box a while back. Old snaps would work too.


I hope I've been able to inspire you a bit and I would love to see your junk creations.

Tuesday, 2 November 2010

Compendium of Curiosities Challenge - Industrial Grunge


It's been a while since I last joined in on the Compendium Challenge. I have missed it but I've just been too busy with other things and of course I was on holiday.
So this week it's Industrial Grunge. Can't say that I had tried it before. And I don't think I will be using this technique much in the future but at least I've tried it once.
And of course it had to be a christmas card, it's the only thing I'm making at the moment.... card wise anyway.
Only 53 days til christmas, yeah!!!!

Sunday, 31 October 2010

Witches Brew for The Altered Element - October Theme "Enchanted"

Today I wanna share with you another project I made for the "Enchanted" theme over at The Altered Element. I wanted to go down a slightly different route, away from the fairy princess style. So when I came across this old metal goblet I thought it be perfect to be altered.


I stamped onto tissues and cut the words out then stuck them onto the goblet carefully using a gel medium (like Golden Medium Matte). When that had dried I started playing with some alcohol inks. I used various browns, some currant. I also dribbled some glossy accents down the side to get drips. And then I just decorated it with some halloween decorations like plastic spiders and bugs, spider webs and some dried plants and leaves.


I tied some old lace round the stem and also tied some rusty old bells to it.

It's really the kinda project where you can use up some old bits of junk and craft leftovers and get messy with alcohol inks. It would also work nicely on old aluminium cookware, bowls, metal jugs.... anything that screams witches brew at you really.

Wednesday, 27 October 2010

Mirror, Mirror on the wall......

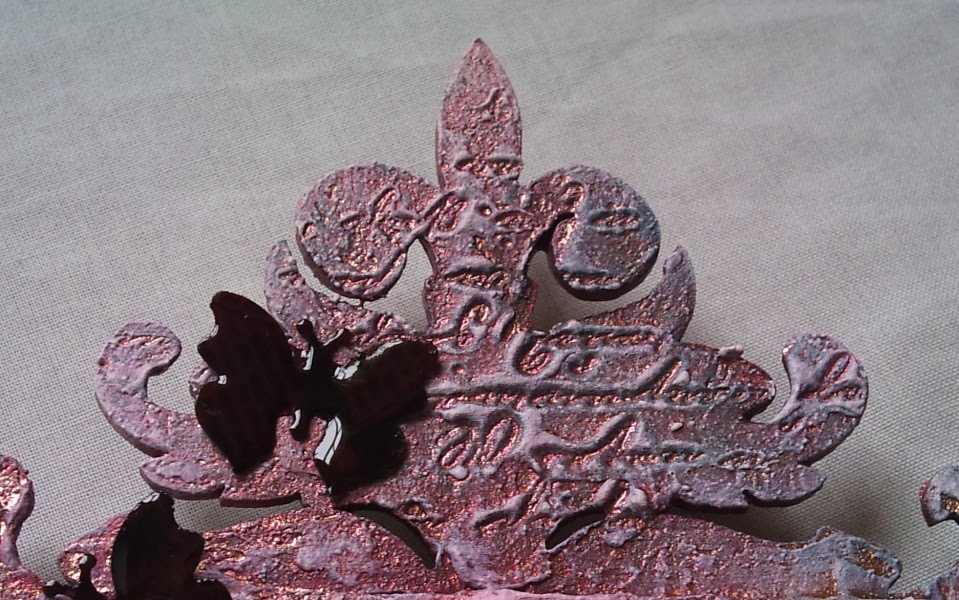
Back from my holiday I would like to share with you my first ever Design Team project. I'm really excited to have been picked for the Altered Element Design Team and this month's theme is "Enchanted". My first project is a Fantasy Mirror......

I used the Twiddleybitz - Fantasy Shadow Frame for this and covered the whole frame in Terra texture paste by Viva Decor. Around a 2-3mm thick layer does the trick. I then used a script stamp and spritzed it with water using a Mini Mister and then pressed the stamp into the texture. I smoothed over some stamped bits to break up the text a bit.
When this had dried completely I painted the whole frame in a dark mulberry colour using Cut n Dry Foam. Any acrylic paint will do for this, just make sure the paint goes onto the script. When it had dried I worked over it using a light pink colour, picking up the higher points of the texture. And then I worked over with a white acrylic paint. To give it that pinky shimmer I sprayed the frame with Cosmic Shimmer Mists. A mix of plum twist and Lava red works really well. If you try this technique the best advice I can give you is to just play around. Try taking off some of the spray with kitchen roll or leave little puddles to dry. Just try it and have fun.
When the shimmer is all dry I picked up the highlights with white acrylic paint once more.


The roses have been created by stamping flowers onto pink paper, then cut out and made into cones. Each cone is then dipped into melted clear UTEE (with some added Flex) and sat inside the bigger cone until you have the finished rose. Just pop a bead into the centre whilst the UTEE is still hot.
I then added some curled memory wire to add a little playful touch. Any kind of coloured copper wire would work nicely here, just curl it round a pokey tool.
The butterflies are simply punched out, stamped onto with a random background stamp and also dipped into UTEE.


I hope you've enjoyed this little project and remember if you want to join in with this month's theme there is a £10 voucher for The Altered Element up for grabs. Check out the blog for details and I can't wait to see what everyone comes up with!!!

Friday, 22 October 2010

Red and Black Face Mirror.....


You may have seen a distress ink mirror I made previously so I wanted to use just faces on this one. I had to use some twice but tried to vary the colours and mix it all up with some idea-ology. It was a test piece for the stamper of the year competition but I didn't like it all that much and in the end decided to make a different mirror for the competition. So now, as the competition deadline is this week I can finally share my reject projects with you. didn't wanna give any ideas away whilst it was still running did I? Hehe.

Tuesday, 19 October 2010

Maya Road Kids Clock


Yes I did make another clock using all those lovely Maya Road mini chipboards. I wanted to make this a bit fun and colourful for my nephew Niklas. He will be 18 months around December and as I'm putting some things in an advent calendar for him I thought I make a clock for his room. That way my sister knows what time it is and he can soon learn the words for all the pretty things on the clock. I coloured the base with distress inks and most of the chipboards too. The heart has red flock stuff on it, the birdie is covered in white glitter, the tree and crown and done with utee and the key and lock are embossed with distress embossing powder.

Saturday, 16 October 2010

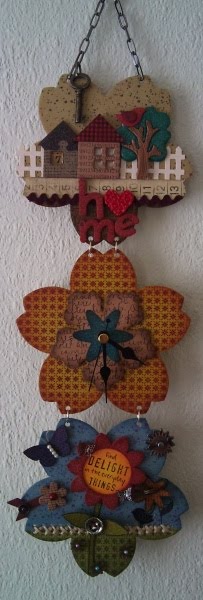
Maya Road Flower Clock


I can finally share with you a project I made weeks ago, and it took me weeks too. It was one of the things I made for the Stamper of the year competition but I then didn't feel like sending for some reason or the other. I used a Maya Road chipboard book in sape of a flower. I couldn't get this in the UK so I had to order it in from the US. In fact many things on this project I especially ordered for this. But now I have a rather large collection of Maya Road mini chipboards to play with in future projects.
I really like the little tree, I covered the top in green utee and then pressed the trunk in, it works so well.
There is lots to discover in these little pictures and as I like making useful objects i thought a cock be perfect.

I am also entering this into the Artistic Stamper Challenge where this month's theme is Layers.