Showing posts with label ideaology. Show all posts

Sunday, 18 December 2011

Shabby Chic House.... and winding down for Christmas

This little house of goodies was made with the Simon says Stamp and Show Challenge in mind, where the theme is "Projects with depth".
I used some leftover configurations boxes and put a roof on top using foamboard. The insides are cut from card and inked with distress inks, then stamped with background stamps. Some tissue tape around the edges to make it neat and you have a shell of a house to fill with goodies.
I used all sorts of things, little miniature bottles with real (evaporated) alcohol inside, game pieces, ideaology, springs, tape measure, an old earring etc etc.

This will be the last larger projects I'm showing on my blog for the year as I'm winding down for Christmas. I have a busy 2 weeks ahead with work, as I only get 2 days off over Christmas and have people over to cook for I have an awful lot of cooking, baking, planning, shopping to do. So I will concentrate on that and wind down my blog until the new year. I will be back with the odd card or post though I'm sure.

Wednesday, 16 November 2011

Vintage Love Notebook

I have been playing with the old glimmer mists for a bit recently and one of my creations is this A5 sized notebook/journal. I used Tim's Kraft resist paper and sprayed it with mists, then went a bit crazy with the butterfly background stamp to create a more interesting background. Add corners. Tattered Angels frame with LOVE stamped on an old book page and some crackled wings. Bind, add fibers and done. Took a bit longer to make than it sounds but I really like it. It's nice and shimmery and vintagy in real life.

Here is a little close up, this might give you a better idea of how nice it shimmers.

I'm going to put this in my Folksy Shop here.

Tuesday, 1 November 2011

Configurations Box for Alter it Monthly November


The start of another month brings of course another Alter it monthly Challenge. As you may know the blog will be closing at the end of the year so after this I only have one more DT piece to show you. Very sad but the end of one thing is the start of a new beginning as they say.


This month the theme is Drawers, Doors and Scecret Compartments.


I used this configurations box and created some little doors using magnets and 2 of the small square boxes I put in the wrong way round to create drawers. Loads of little bits to discover here.


Now pop over to the blog to see all the other DT pieces and maybe you'll leave inspired to join in the challenge.


I'm off to keep working on my new blog, I'm currently fighting with Photoshop but it just doesn't want to do what I want it to. Mean!

Friday, 23 September 2011

Trapped butterflies ATC for Simon Says

It's ATC time at Simon says Stamp and Show and I haven't made any in ages. I like working on a small scale sometimes as you get to try many different techniques in a short space of time.
I have wanted to get out my sewing machine for some projects so I thought why not sew all over my ATC's. I made a few today. First up I'd like to share my trapped butterflies. They are loose behind the netting and can move around. When I saw those netting offcuts (used for wig making, my sister had some spare pieces) I just knew I had to make little sewn pockets of some sort and put things behind it.

This one was simple really, didn't stop me from faffing about with it for ages though. More ATC's to come so watch this space.....

Saturday, 17 September 2011

Journal of Imagination for Just Stamps Magazine

The latest issue of JUST STAMPS - EINFACH STEMPELN is in the shops, German shops that is. And I'm delighted there is quite a few pieces of mine featured this time round.
For the Shabby Chic theme I made a small bound notebook and also this larger journal. Although there is much stamping on the journal it is a favourite of mine.


The journal is available for purchase in my Folksy Shop.

Wednesday, 7 September 2011

Faux Stained Glass Keyring


Over at The Stampsmith we are being challenged to try out faux techniques. So I thought I hadn't played with my alcohol inks in a while and I created this faux stained glass keyring. The stamps used are both Stampotique which I love at the moment.

And over at Happy Daze this month's challenge is "Little Black Dress" - use a technique, product or tool you just keep coming back to over and over again.
I have so many, but one of the is Tim Holt'z idea-ology. I use these swivel clasps for all the keyrings I make and always add a little something extra like here the token and the gears. Can't live without idea-ology. Plenty of idea-ology available from the Happy Daze shop as well as the Stampotique stamps so check them out!

Saturday, 2 July 2011

Try it on Tuesday - Boxed Up!

I'm really enjoying the Try it on Tuesday Altered Art weeks, great themes and inspiration from the DT.

This week we are boxing things. I used an old box from some metal coins. It was just a perfect size with six little compartments. So I painted and collaged it with various things. Like I mentioned before I am doing a fair bit of art journal style stuff at the moment so I was just painting, inking, spraying things I thought may as well do the box like it too.
Add some ideaology, cut out some hearts and make x's from wired paper ribbon, which came off some packaging so plenty of recycling in this project too.

Check out the Try it on Tuesday blog and their sponsor for the week - The Craft Barn.

Thursday, 30 June 2011

Dangly birdcage necklace

I picked up this little birdcage with bird (pack of 2 cages and 4 birds) a little while ago but only just got round to making this necklace. I knew the cage would be perfect to make into a long dangly necklace with a bunch of other charms.
It is very easy to make, I used all golden charms and chain and matching jumprings and just put it all together.

The birdcage set and idea-ology pieces are available from Happy Daze and I am entering this into their DANGLY THINGS Challenge.


Tuesday, 28 June 2011

A bottle of inspiration

Sometimes ideas just come to you when you least expect it and that was the case with this bottle. The grungepaper top was an idea by the amazing Lin of LB Crafts, she had made little glass vial bottle trees like that and added them to a project and I liked them so much I wanted to make some too.
So there was me sitting at work one day drinking a bottle of Firefly and I peeled the label off as it's one of those shrink wrap labels that come off easy and I was left with this perfect clear bottle. I thought that be really noce to paint with the Paper Artsy paint just like a project we did at the Artsy Crafts event and I could make a big grungepaper tree and decorate the bottle. And there you go.
I made this for the Happy Daze Challenge where the theme is Dangly Things. And Simon says Stamp and Show wants to see Words this week.

Monday, 6 June 2011

Dreaming Dolly Keyring

It's another altered art themed week at Try it on Tuesday.... well it is until midnight tonight, I am a bit late with my entry this time, but nevertheless I created this little dreaming dolly keyring.

The theme is Dreams and it's sponsored by The Craft Barn.

I've not made any keycharms in ages so it was about time. I love them really full of little charms and things. The silver charm reads "Follow your dreams".

Wednesday, 13 April 2011

Vintage Butterfly Mirror

As mentioned before I'm making a lot of stuff for a craft fair at the moment and this is another piece I'll be displaying there. I used an Ikea mirror as they are so cheap and everytime I head to Ikea I stock up on a few of these. I covered it with Tim Holtz Kraft Resist paper which then got white washed and distressed with some distress inks, especially round the edges. From another sheet of the same paper I cute some butterflies and sprayed them with perfect pearls mist and stuck them on with foam pads. Gold corners and letters stuck on and it's done. It's very easy but looks lovely and old and vintagy. I may have to flick through the paper pack again and see what other papers may work well for use with the mirrors. I'm entering this into the Simon says Stamp and Show Challenge where the theme is distressing!

Wednesday, 9 March 2011

Something blue, something new, something metal

As mentioned before I finally got to play with some metal over the weekend. Well, I had the tools and everything here for a while now, like half a year but never really managed to create anything worthwhile with it. I have always admired the Paper Artsy projects using metal and I've been inspired after seeing a frame at a recent Artsy Crafts Event. I embossed some blue metal and sanded it to make the script "pop".
The flower was made from silver metal with a flower stamped on, cut out and made into a rose type flower (with my added extra bits in the centre). Check out the Paper Artsy videos on You Tube, there is a great tutorial for making your own.
The little shadow box frame has just been coloured with Viva Inka-Gold Paste, I love that stuff.

This is being entered into a few challenges. First of all there is The Stampsmith Challenge where the challenge is to use something new. And as it's my first proper metal project I reckon it qualifies. Also the Simon says Stamp and Show Challenge where the theme is Metal. And last but not least Happy Daze have started a challenge on their facebook page. It's a fab shop I have been ordering a fair few stamps from recently and they also stock the metal and Viva products I used on this projects.

Monday, 7 March 2011

New Art Parts and catching up.....

I've just had a 2 day weekend, it's amazing, everyone should try it! Oh hang on, it's just me who normally only gets 1 day off a week. Bugger.
So I finally had a full day crafting today and I managed to catch up on a lot of things like my magazine contributions and Alter it monthly. And got a chance to play with some metal (more of that later in the week) and also had a little play with the new art parts pocket watch, when I first saw it I knew I had to have them! It's amazing. I used an Artistic Outpost image here and filled the whole thing with UTEE afterwards and sprinkled some beads on top. I really like these, but still not quite sure how to display them. Any great suggestions please leave a comment. Maybe stick a few on a canvas and display them on the wall?

I also managed to bring my Flickr Gallery up to date and got to put all new pictures on my Website next. Still keeping busy and plenty more overtime hours at work to come but at least I feel like I'm on top of things again. Yeah!!!

Also really wanting to do more workshops this year, maybe artsy crafts or something to do with art journalling. I'll have to do my research and get planning!!

Thursday, 3 February 2011

A quick and effective Valentines Card.....


Are there any crafty lovers out there with a severe lack of time at the moment? Well, there's me, still working endless hours and in need of a card for valentine's. So I took some inspiration from Tim's compendium and embossed some grungepaper and inked it all up nice and vintagy. Then used an ornate frame for the message. I used the painted metal technique here, it's this weeks task over at Studio L3's Compendium Challenge, which I havent joined in in ages so it was about time. I filled the frame with crackle accents. It's real quick and easy and I find very effective.
I am also entering this into the Simon says Stamp Challenge and Stamp and Show Challenge where the theme is LOVE this week.
Oh I have missed the challenges, cant wait to have more time to craft again.

Tuesday, 1 February 2011

Mini Canvas Frame Tutorial - Alter it monthly

This month is my first month with Alter it monthly and it's an honour to be part of such a fun blog! The theme this month is Shrines, Alters and Nichos... if that sounds like a fun challenge why don't you come and join in, there is a prize to be won.

A for my piece this month I used two mini canvases to make a deep frame and I just wanted to share with you how my piece was created.

This is my first little picture tutorial so any comments and ideas for improvement are more than welcome.


Get yourself some mini canvases, although this would work with any size canvas. Cut the canvas out of one of them and glue onto the back of the other one so you have a deep frame to decorate. In this case I covered it with Terra Texture paste, you can apply it as rough or smooth as you like. The reason why I like using a texture paste on the back of canvases, it's because it covers up and stapled bits of canvas or canvas edges very nicely.

When dry, paint in a neutral colour like Traditional Tan.


I then rubbed over some Inka Gold, this is an amazing product almost like shoe polish. I apply it with my fingers, bit messy but great fun. I just rub it over the frame to pick up bits of the texture.


Now find yourself some items you want to display in the frame or decorate it with. I had two old chess figures lying around. I painted one in Modern Masters Iron Paint and the other one in Modern Masters Bronze Paint. These come with different type activators......

For the Iron Paint I used a rust activator and for the Bronze Paint I used a blue patina activator. The effect is particularly visible where more activator was applied. Gives a nice aged effect, I love these paints. Next step is to place them in your frame and decorate to your liking, I used tissue tape to add a little playful touch.

Get some more embellies ready.


Assemble it all.

Lastly I sprayed the whole thing with a bronze shimmer spray.
Now get yourself some canvases and get making, it's great fun and as these are fairly small it is also a very quick project.

Sunday, 19 December 2010

Lord Tim of Holtz Mirror

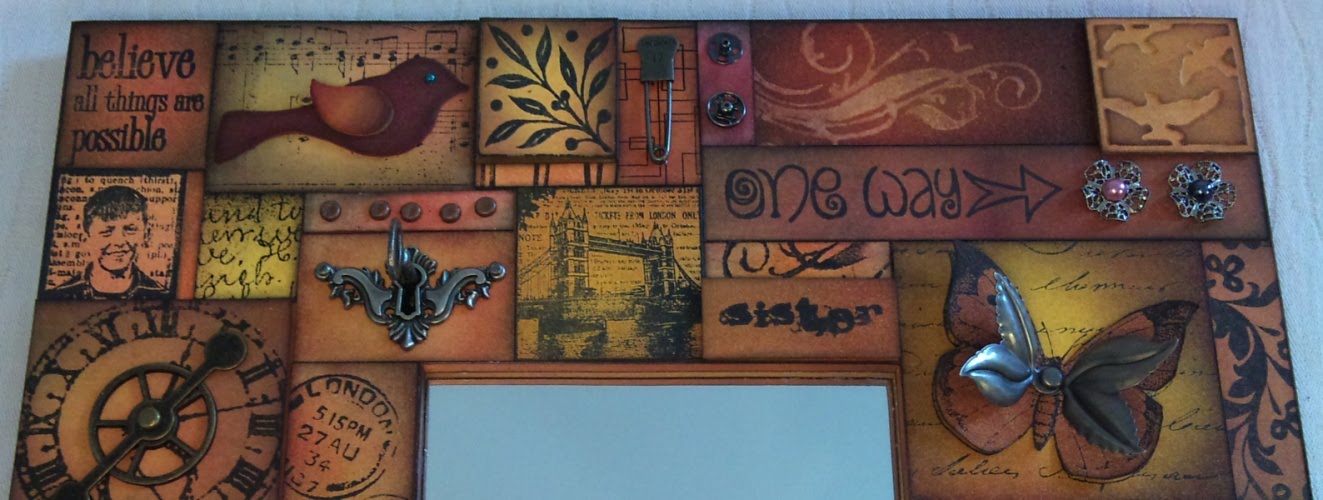
If you have been following my blog from pretty much the start you may have seen a similar mirror before, one of my first mirror creations in fact. So I wanted to make another one using distress inks and the blending tool, one of my favourite Tim techniques.
It's a collage of stamped images, embossed pieces, ideaology etc. Some pieces are raised for more depth. The keyhole actually got a key in it, although it's difficult to tell from this angle. The piece combines many different favourite stamps of mine and many techniques too.

I am entering this into the Stamp and Show Challenge.


Sunday, 12 December 2010

Tim's 12 tags of Christmas......

More of Tim's tags, yippie.
Now when it comes to these two..... when i first saw day 9 I was in love. But I don't have the rosette die (yet!!!) or the letters either, so I had to substitute a lot and it just made it look a bit crap may I say. Loving the swishy ink background with the music stamp though, that turned out pretty well.


Day 10 was another substitute day for me as I didnt have the snowman or the snowflake embossing folder. So I used 3 reindeer and I named the reindeer SNOWY and put that in letters underneath. The background is inky with a subtle starry background. I embossed some thick acetate with a dots embossing folder and i really like this tag. The embossed acetate just makes it, thanks Tim for the idea. Pure genius!!!

And of course I am entering these into the Artistic Stamper Challenge.

Friday, 22 October 2010

Red and Black Face Mirror.....


You may have seen a distress ink mirror I made previously so I wanted to use just faces on this one. I had to use some twice but tried to vary the colours and mix it all up with some idea-ology. It was a test piece for the stamper of the year competition but I didn't like it all that much and in the end decided to make a different mirror for the competition. So now, as the competition deadline is this week I can finally share my reject projects with you. didn't wanna give any ideas away whilst it was still running did I? Hehe.

Wednesday, 13 October 2010

Stamp and show us some metal.....


antjes bracelet
Originally uploaded by Anikraft

I think it's time once more for me to enter the challenge at Simon says Stamp and Show. And this week it's metal. I made this bracelet for my sister, hope she doesnt read this, ooops.

I have to admit the stamping is minimal but it's there. I basically punched some circle from the Tim Holtz Lost and Found paper stack. I inked some of the edges. The heart charm on the end is inked with distress ink and stamped. The picture in the centre is my sister and I and the years are our birth years.

Check out the big size picture in my Flickr stream, I'm sorry the picture wouldnt upload the right way round in blogger. They really need to do something about that.

Monday, 26 July 2010

CCC #7

Just back from a weeks holidays in Spain I have been looking forward to playing with my stamps again and of course joining the CCC. It's not just that no.7 is actually my favourite number but it also happens to be my favourite technique - tinted vision fragments.


So for my entry this week I have made a keyring. I have not actually used a fragment but memory glass and a frame. The technique is still the same otherwise. I framed an old photo of me and my sister that I printed out in a sepia effect.


If you havent joined in the Compendium challenge yet then do so here.